Monday, March 27, 2017

First Snowfall

No, thankfully it's not snowing here.  
The title refers to another one of Robin Perfetti's 
snowflakes called First Snowfall, link here:
it's getting ready to become another ornament cover. 
You really ought to check out her other beautiful 
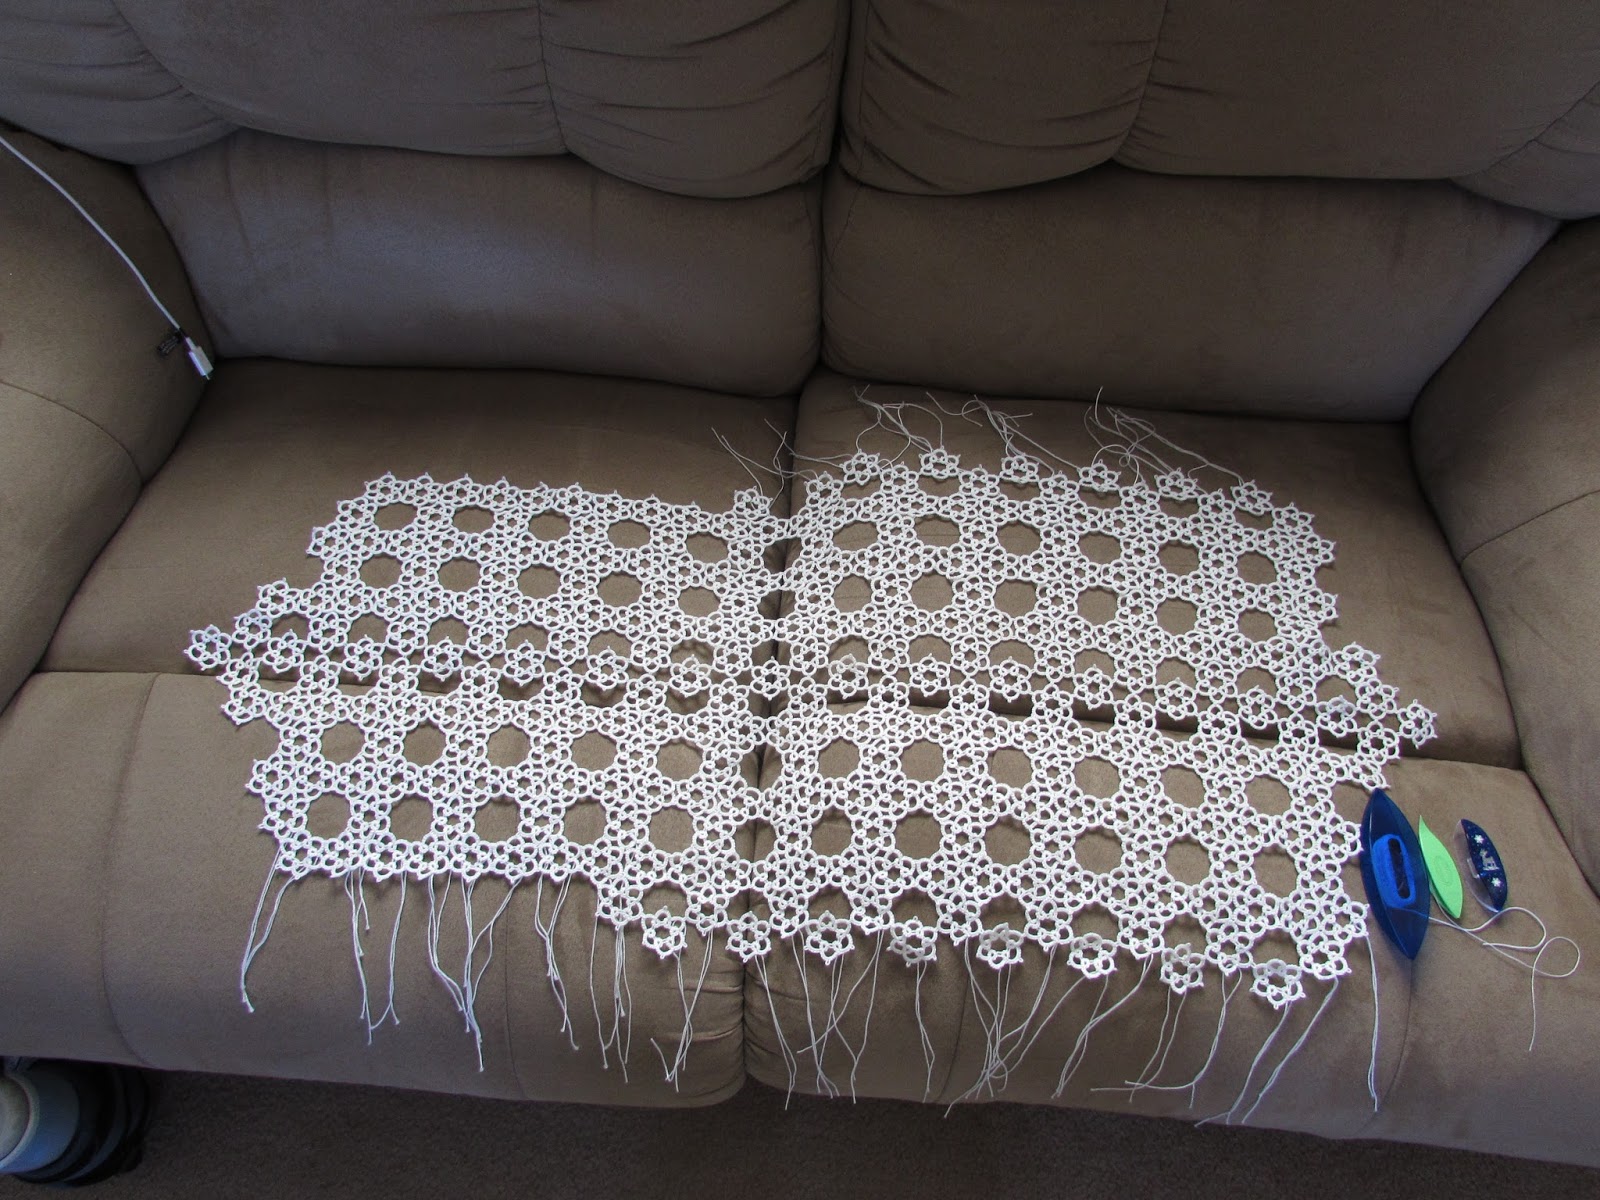
patterns.  :)  This one is tatted in size 40 Lizbeth 
Snow White and is the same size as the picture on 
the printed pattern(amazing!).  And I added some 
other items for size comparison.  The next one will 
have the center rings omitted for the top of the ornament.
 And below is my show model!  Isn't this the most 
adorable colored bunny??  There was a Build-a-Bear 
ad on my facebook(the only add worth looking at) 
with the cutest colored stuffed animals, and this little 
bunny was in front.  I told our daughter about it and 
she immediately ordered it for me(without me knowing,
so.....Saturday I was "bouncing" around with joy over 
owning this adorable little bunny!!!  :)
So, now I have 2 Build-a-Bear characters:
Rudolph the red-nosed Reindeer, and this 
Bunny(gotta name it yet!).  :)
Have a wonderful day tatting!!! :)

Saturday, March 25, 2017

Personal challenge # 5

Still working on filling the ornament display. 
This is Robin Perfetti's Late Winter Snowflake-
The top one has the center rings omitted, and the bottom 
one includes them.  To see it flat look at the previous post.  
It fits pretty good.
 Here is a look at the bottom.
 Here it has joined the others on the display.
5 down and 19 to go.  :)
Have a blessed weekend and happy tatting!!  :)

Thursday, March 23, 2017

Green Snowflake??

This is Robin Perfetti's Late Winter Snowflake-
since it's in green and tatted in March I will call it 
the early spring snowflake.  It is a fabulously
 designed snowflake, and it will soon be an ornament 
decoration when I tat it's twin.  :)
Oops, I forgot to say that I omitted the center rings 
so that it will fit over the ornament top and it 
didn't take 2 shuttles that way, now I am thinking 
that I should make the next one with the center 
rings for the bottom....decisions!
Have a happy tatting time!!!  :)


Tuesday, March 21, 2017

Another Personal Challenge Ornament, and a little more tablecloth

This next ornament didn't go as planned, but looks 
pretty sharp-I think!  :)
 It's tatted with DMC Metallic embroidery thread.  I 
don't know what size that is, but I will say I hate how 
scratchy it is.  I drug my feet working on the first part 
due to the roughness of the thread, but forced myself 
to get it done.  It will take force to make more in this 
thread!!!
 The pattern is Fancy Snowflake from Easy Tatting 
by Rozella F. Linden.  Now let me admit something...
I started to make the snowflake figuring it would 
work with the center of the snowflake at the top and 
bottom of the ornament, but I missed a join and then 
another, and with that metallic it's a bad idea to open 
rings or untat chains cuz' it shreds and breaks easy, 
even when tatting. So I resolved to just leave it and 
I tied the joins when finished.  And I just pulled a 
string through the top and bottom center picots and 
tied it off.
 I love the look from the bottom!
Below is a picture of the 4 done.
 And, both sides are currently equal on the tablecloth, 
and I am now adding length to the center so I can 
then I can work on getting it all to the width of the 
rest of it and hopefully take a break to sew in ends 
after that.  Then, go back and keep adding width to 
the entire length.  :)  It's a learning process!!  :)
Hope your day is blessed with love and tatting!!!  :)

Friday, March 17, 2017

Found these adorable tatted fairies while searching the internet

http://atsaka.exblog.jp/i21/2/
I was trying to figure out how to contact the tatter, 
but as far as I can tell it's Japanese and I can't find 
how to contact the tatter.  I was just curious to know 
if they sell these adorable fairies.
If anyone knows, please let me know, if not, oh well,
just another thing to dream about.  :)

Thursday, March 16, 2017

Almost a true Ice Drop

I love to see through things especially with tatting!!! :)
 This one has the "gem" I was trying to work with 
earlier.
 I had to drastically change stitch count and ended up 
with the back rings 8-8-8-8 chains 10-10, the front 
rings are 10-10-10, and the chains are 14.  And, if 
you didn't notice, there are only 5 rings and chains.
And here it is so you can see the Lizbeth Peacock 
Blues better.  Oh, and remember, I used size 40(my 
preferred size).
Have a happy tatting day!!!  :)

Needing a change

Needing to tat something different and having some 
gems that I could make into Ice Drops, I decided to 
try, but I used size 40 thread and the tatting was too 
tight for the gem.
Below is the comparison.  I have had these blue gems 
for several years in a fish type bowl my daughter had 
received for a candle and she gave it to me. so I 
thought I would try. This is Diane's Ice Drop 
Tutorial pattern: 
Oh, side note, I tatted a ring at the top when I finished 
tatting the pattern.
I had to find something to put inside the tatting(of 
course!), so I went and found a left over clear rose 
bead from the large pink suncatcher I made(you  can 
see the beads clearly here and even zoom in:  
I like that you can see right through it.  :)
Well, that is all for now.
Have a wonderful tat-filled day!!!  :)


Wednesday, March 15, 2017

A motif at a time....................

Almost have both side of the current length done, 
but I also have to extend this about double it's size 
YIKES!!!  
 I was asked how many balls of thread I had already 
used, well.....I actually bought this Aunt Lydia's huge 
ball of thread when I first started tatting because it 
was the only available thread here in town, and being 
new to tatting at that time I just bought what I could.  
It was intended for tons of tatted snowflakes, until 
I found Lizbeth thread and lots of fun colors which 
put snowflakes on the side for all kinds of other 
interesting projects!!  
Well, I have 2 of these huge balls of white thread, 
and this is the one that has been used the most and 
you can see it still have a ton of thread on it(thank-
fully, so I don't have to buy more for this project 
any time soon!).  And I set my Tatsy shuttle up 
next to it to show how large it is.
Have a fabulous tatting time!!!  :)

Thursday, March 9, 2017

Finally completely finished!!!

Nope, not the tablecloth!!!
These necklaces for our granddaughter.  I have 
searched for a sheer ribbon for the pink necklace, 
but no store in town has what I need, so we found 
this pretty ribbon and added it. And a clasp which 
is at the front so she should be able to put it on all 
by herself.  Also, the purple has it's clasp now too.  :)
Have a wonderful day!!!
And some tatting too!!  I already have 2 more motifs 
on the tablecloth today!  :)

Wednesday, March 8, 2017

Another small update on the slowly progressing tablecloth

Making progress!!
This picture is on our loveseat to show the current 
size, but it really needs to almost double in length.
 Shhhhh....no one tell me about all those frustrating 
ends which need hiding please, I am pretending 
they don't exist!!!!  I figure if I get both sides 
completed as is right now, then I will force myself 
to face reality on those ends.  I also want to at least 
get the center section to the needed length this year.
 I have been using one of my Tatsy shuttles so I don't 
have to rewind a shuttle over and over.  And, I have 
it here next to a Clover shuttle which is my normally 
used shuttle for size comparison, and, then a new 
addition for me!!!  
 Introducing my Rudolph shuttle!!!!  :)
Can you tell I love it!!!  Blue is my favorite color, 
and Rudolph the Red-nosed Reindeer is one of my 
absolute favorite Christmas movies(been watching 
it since the year I was born-my mom told me she 
put me in front of the tv to watch it and I have 
every year since(well...not this past year since I 
was busy with my mom dying).
And...when I call my hubby-the ring tone on his 
cell phone for me is Rudolph the Red-nosed 
Reindeer.  :)  So when I was wandering around 
the internet and came across this awesome 
shuttle I asked about it and my hubby said to 
order it and here it is-MINE!!!!  :)
***sorry, I am not sharing!, but to get a 
beautiful shuttle of your own, contact 
Have a wonderful day!!!
May you achieve lots of tatting fun!!!  :)

Saturday, March 4, 2017

Tablecloth update

I now have half the length added to on the left side 
and just another couple of motifs and the right side 
will be there also!!!  I am so excited at the progress 
I have made on this-this year already!!!  :)
Hopefully this year will be much better than last 
year and I will have lots of tatting accomplished!!! 
And I hope to also get the center of this to the length 
of my table this year too!  :)
Well, that's pretty good for today.
Have a great weekend!!  :)

Another ornament for My Personal Challenge

I had this first part tatted about a month ago.
I found the pattern at http://allcrafts.net/tatting.htm
 I started a second and started joining to the first.
 Continuing tatting.
 Checking the tatting on the ornament from time to time.
 I tat as much as I can without the ornament and 
then I get to a point where I have to put the 
ornament in and finish.
 Tatting with ornament in hand(frustration time).
I finished tatting that little space.
There are now 3 ornaments on the display! 
 Closer up.
 Another closer view.
 This is the new one.
 With flash.
And a flash view of the last one. 
I checked the ornament boxes for sizes, but they 
don't tell, so....I took a measuring tape and guessed.
I am terrible with measuring for some reason, but...
if I am right the small ones are 1 1/2 inches in 
diameter, and the larger(the gold with red on the 
lower hanger) is 2 inches in diameter.
I also sewed ends in on my Spring Doily from 
last year, and on our granddaughter's necklace, 
and I tatted a few more motifs on the tablecloth.
Hope your day is filled with tatting and peace!!  :)

Thursday, March 2, 2017

My Personal Challenge update

I had the top and bottom of this tatting done all last 
week, but was trying to figure out what to do for the 
center all the way around the ornament.
Well, I figured it out and today I finished(not perfect, 
but nice for me).  I thought I would show some in 
progress photos so you would have some idea of 
how I put tatting on glass ornaments.  
The first picture is the tatting joined by the center 
about 1/2 way around sitting by itself.
 This next picture shows how I slide the ornament into 
the tatting.
 Then, while carefully and quite challenging, I hold the 
ornament in my hand while finishing the tatting around it.
 And more....
 And carefully "resting the ornament"on my hand (which
 has a tendency to roll and swing off my hand), while 
tatting a ring. I finished that bare section where you 
see the red.
 And, it's on the display.
 I bit of a close-up. I made the white frilly to 
try to make it look like snow.
 Here are the first 2 on.  The first one is larger 
than this one.  And both of these are smaller than 
others I made years ago.
I have also added about another 2-4 motifs to the 
tablecloth this week so far.
Happy tatting and have a wonderful day!!!  :)